Homemade Ricotta With Asparagus: A Simple Spring Recipe
Asparagus season is always a highlight of spring. Tender green spears, gently sautéed with butter and garlic, are the perfect reminder that winter is behind us and fresh produce is back. Pair them with soft, creamy homemade ricotta and you have something truly special. This easy asparagus recipe is simple enough to make on a weekday but elegant enough to serve as a starter at your next dinner party. It works beautifully as a light lunch or dinner, and it’s also great as a side dish to something heartier.
In this post, I’ll show you how to make your own ricotta from scratch and serve it with golden, garlicky asparagus and a handful of crisp salad greens. It’s the kind of dish that celebrates fresh ingredients and minimal effort – the best of spring on a plate.
Making Ricotta at Home Is Easier Than You Think
If you’ve never made ricotta before, don’t worry, it’s incredibly simple. You don’t need any fancy equipment, just a pot, a strainer, and some cheesecloth. The only extra thing you’ll need is a cooking thermometer, which helps you know exactly when the milk has reached the right temperature to curdle. More on that in a moment.
The process takes about an hour from start to finish, but most of that time is hands-off while the ricotta drains. The results are so much better than anything store-bought. The texture is richer, the flavor is fresher, and you get the satisfaction of having made cheese in your own kitchen. It’s the kind of slow, satisfying cooking that feels both old-fashioned and deeply grounding.
Use The Right Milk
One important detail when making homemade ricotta is the milk. You must use whole milk that is not ultra-pasteurized. Ultra-pasteurized milk has been heated to such a high temperature that its proteins are no longer able to curdle properly. That means you’ll end up with very few curds, or worse, a completely smooth liquid that never sets.
Check the label on your milk before you start. Regular pasteurized milk is perfect, and if you can find cream that’s not ultra-pasteurized either, that’s even better. The cream helps make the ricotta extra rich and soft. For this recipe, I use a mix of 1 ½ liters of whole milk and 3 deciliters of heavy cream, which gives the perfect balance.
Lemon Juice Or White Wine Vinegar?
Once the milk and cream are heated to the right temperature, between 85 and 90 degrees Celsius (185–195°F), you add an acid to help the curds form. You can use lemon juice or white wine vinegar here. Both work well. Lemon juice gives the ricotta a slightly brighter flavor, while white wine vinegar is more neutral.
I tend to use whatever I have on hand, and both give good results. You’ll need about half a deciliter, or roughly 3 tablespoons plus 1 teaspoon, stirred in once you turn off the heat. Then, you let the mixture sit undisturbed for about 10 to 15 minutes. The curds will form naturally, separating from the watery whey.
Why You Need A Cooking Thermometer
If you want consistent results, a cooking thermometer is your best friend. Heating the milk too little and the curds won’t form. Heat it too much, and you risk scorching the bottom or ending up with rubbery curds. A thermometer takes out the guesswork and gives you a beautiful ricotta every time.
This is the one I recommend. It’s quick, reliable, and easy to read. I use it for everything from cheese making to checking meat temperatures and even candy making.
Don’t Throw Out The Whey
After straining your ricotta, you’ll be left with a pale yellow liquid called whey. Don’t pour it down the drain. It’s full of protein, minerals, and flavor, and you can use it in a bunch of different ways.
Try using it instead of water when making bread or pizza dough. Add it to smoothies for a protein boost. Use it to cook grains like rice, couscous, or quinoa. You can even use it in pancake or waffle batter. It keeps well in the fridge for a few days and can be frozen if you’re not ready to use it right away.
Flavoring Your Ricotta
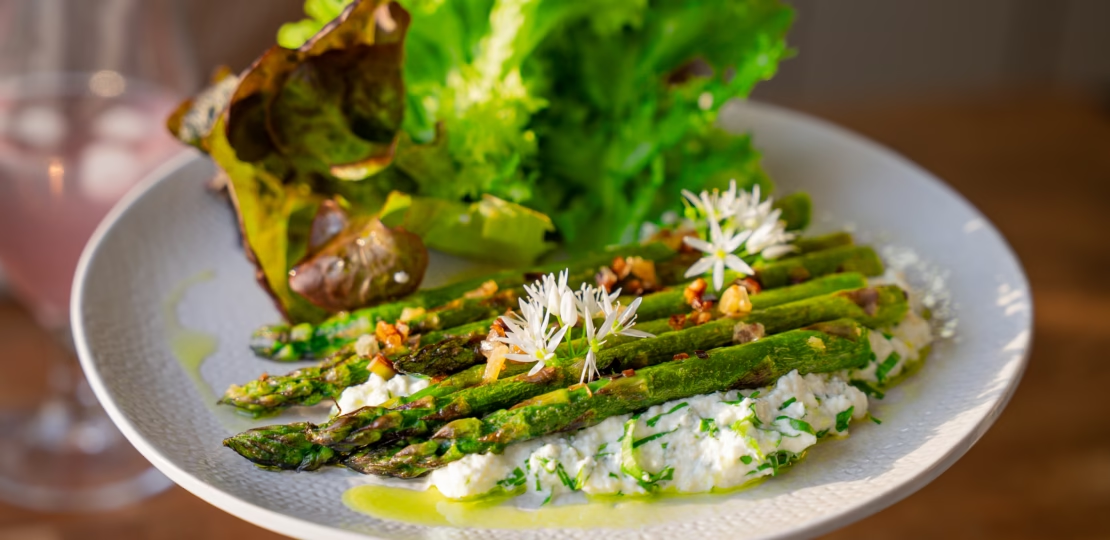
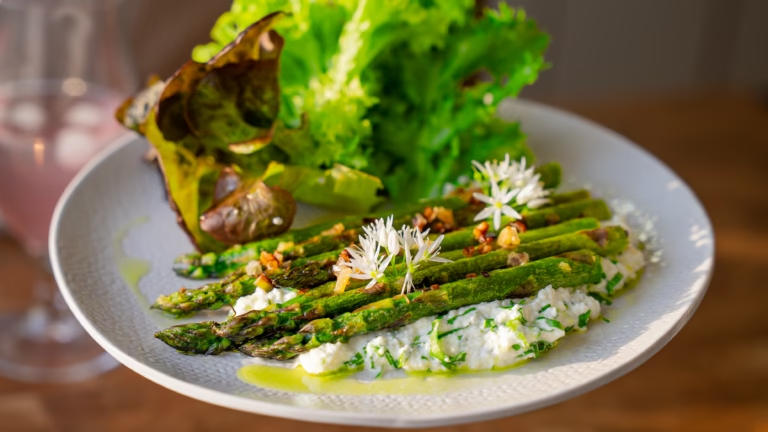
Once you’ve made your ricotta, you can leave it plain or mix in fresh herbs and other flavors. I like to stir in a pinch of salt along with chopped parsley or chives. If I’m lucky enough to find it, I also add some wild garlic. It has a soft, garlicky flavor that pairs beautifully with ricotta and asparagus.
You could also try lemon zest, finely chopped basil, or even a bit of ground black pepper. Crushed red pepper flakes, dill, or thyme would also be lovely. The ricotta is a blank canvas, and this is a great opportunity to use whatever herbs or aromatics are in season or growing in your garden.
Simple, Seasonal, And Beautiful
To serve this dish, spread a generous spoonful of ricotta on a plate, top it with sautéed asparagus, and spoon over the buttery garlic from the pan. I like to keep it simple and serve this with a handful of lettuce or a light green salad on the side. Something crisp and fresh balances the creaminess of the ricotta perfectly.
If you’re making this as a starter, just a few spears of asparagus and a dollop of ricotta is enough to whet the appetite. For a light lunch or dinner, serve a bit more, maybe with a slice of sourdough bread or a soft-boiled egg on the side. It’s nourishing, bright, and satisfying in the way that spring food should be.
A Spring Dish To Remember
This ricotta and asparagus recipe is one of those dishes that feels like a little reward for paying attention to the seasons. It’s easy to make, with just a few ingredients, and it brings out the best in each one. The homemade ricotta is rich and soft, the asparagus is tender and golden, and the whole thing comes together with a few simple steps.
It’s a gentle, wholesome meal that works as well on a busy weekday as it does for a special weekend lunch. I hope you give it a try this spring. Once you make your own ricotta, you may never go back.
Easy spring recipe with asparagus and homemade ricotta. Learn how to make creamy ricotta from scratch and serve it with sautéed asparagus for a light lunch, side dish, or starter.
Total Time:1 hour
Yield:2–3 portions 1x
Ingredients
Scale
Ricotta
1 ½ l (6 ⅓ cups) whole milk (not ultra-pasteurized)
3 dl (1 ¼ cups) heavy cream (not ultra-pasteurized)
½ dl (3 tbsp + 1 tsp) lemon juice or white wine vinegar
2 tsp salt
Parsley, chopped
Wild garlic, chopped (optional)
Asparagus
300 g (10 ½ oz) asparagus
2 tbsp olive oil
2 garlic cloves, minced (or fresh garlic)
3 tbsp butter
Salt, to taste
To Serve
A salad or lettuce
Instructions
Ricotta
Pour the milk and cream into a large pot and heat gently over medium heat, stirring often to avoid scorching. Bring the temperature to 85–90°C (185–195°F), then turn off the heat.
Add the lemon juice or vinegar and give it a quick stir. The mixture should begin to curdle. Let it sit undisturbed for 10–15 minutes to fully separate.
Line a sieve with cheesecloth and carefully pour the mixture through to strain. Let the ricotta drain for 30–60 minutes, depending on how thick you want it.
Once drained, transfer the ricotta to a bowl and mix in chopped parsley and wild garlic, if using. Taste and adjust the salt if needed.
Asparagus
Prepare the asparagus by snapping off the woody ends near the base.
Heat the olive oil in a frying pan over medium heat. Add the asparagus and garlic, then the butter. Sauté for several minutes until the asparagus is tender and golden. Season with salt to taste.
To serve, spread a generous layer of ricotta on each plate. Lay the sautéed asparagus on top and spoon over the garlicky butter from the pan. Serve with a fresh salad or a few leaves of lettuce on the side. Enjoy!